Wednesday, June 30, 2010

Storage Canisters

I can't resist them. I have been known to buy food items that have containers with reusable potential. Crafters can never have enough storage for organizing all their supplies and those of you who are my flickr friends will already know how many of these I've made! LOL

A list of supplies:

ScorPal Not essential, but useful for scoring straight lines once you've measured how big your paper needs to be.
Paper Trimmer Essential (IMO)
Doublesided Designer Paper I am using K&Co. It is thicker than normal DP, but not as thick as cardstock
Scortape Essential to use a strong tape
Ruler As you see, I have a flimsy floppy ruler but it works!


Here you see the double sided paper I am using. Like I said it is K&Co. Amy Butler series. I have measured my container and cut my paper to size. I am going to be using both sides of this paper as they coordinate perfectly and why not?


Now is time to lay your scoretape down on the reverse of your paper.Peel off the protective paper. Attach to canister. You want to be very careful because scortape is very permanant. You're going to have trouble if you need to get it up and might lose a few fingerprints in the process. LOL


I also want to decorate my lid. you dont have to but it looks "finshed" if you do. I measured my lid insert and it just so happens that I have a circle nestability that fits it perfectly so I go ahead and cut out my circle using my 3 inch diecut. I also attach this with scortape.


And the finshed product! Isn't it gorgeous?


wish I had something to put in it....looks like I need to go shopping...

For more conatiner pics and ideas visit my craft space on flickr:


Monday, June 28, 2010

At Five Weeks


Just a ducky update. :-) They're five weeks old now and doing well. Well, pretty well. Gollywog, our black runner has developed an unsteadiness in his legs. He starts shaking if he stands too long. I have contacted the company and they say that it is because the baby food has too much protein which can cause leg problems. Thanks guys. We have started mixing the adult food in with the duckling food and also putting B Vitamins in their water as well as catching them small fish and bugs and supplimenting with vegetable scraps. Gollywog seems a bit stronger today. Here is Lulu. You can see her feathers starting to come in. She's at the "awkward age" of adolesence. LOL:


And here is Tweety (my daughter) fishing for the fish. (duh. What else do you "fish" for?)


And below is the sweet little Gollywog himself. Isn't he cute? Hopefully he'll get stronger and be ok. Where he is our only male runner, our chances of getting baby runners are zilch without him. Besides he's so handsome, the ladies love him!


Sunday, June 27, 2010

Penny Black Joy Fold


THis is a joy fold card that I made a couple of weeks ago and completely forgot to upload. Its a penny Black image colored with distress inks and mounted on K&Co double sided papers. (Amy Butler series). Below you'll see it unfolded:


And the inside:

I wonder how many others are just sitting around on my computer that I never uploaded...
I've been trying to organize my flickr space and seperating the cards I make according to designers as I'm getting too many to just shove in a set called "Cards". Hopefully I'll be able to find them now!
Thanks for stopping by. :-)


Saturday, June 26, 2010

Card Challenges


I've been down for the last few days with a bug so have been busy blowing my nose and making cards. I have two cards in this post made for various challenges. The first is a card that I made using a lovely stamp by Penny Black which I colored with distress inks and mounted on various dps and embossed the background using a cuttlebug embossing folder. It qualifies for two challenges:
PB Allsorts Challenge
C4C Sketch
Here is a close up of the image:


You can see the little "water" droplets that I made using "Crackle Accents". Have a closer look...


And here is the second card, made for Penny Black Saturday Challenge and also
Card Patterns.

I also colored this cute kitty with distress inks, used a scalloped nestability to mount it as well as 3D adhesive foam pads to raise the image up a bit. The papers are all from my scrap stash, and machine stitched. A close up below:


I'm actually not crazy about this card, but its done and I suppose I will find some use for it. Maybe its not bright enough for my taste, I don't know.Oh well, they can't always come out as you want them to, can they?


Featured Stamper

Wow!
Someone pinch me! No! Don't. I changed my mind. I bruise easily. lol
I was scrolling through my blog updates this morning, making note of the new challenges for Saturday when I saw myself as a featured stamper for Whimsy's Inspiration blog! Dude! How did that happen?
Some of you may see your name but it doesn't set your heart pounding cos you know that it may not be you but one of the other 200,000 people with the same name, right? So you have to kind of temper your excitement until you know for sure...
But as I have never yet met a Dorcas (and those who have met one are all about 96 years old) , on the rare occasion I do see my name in print or hear someone call it out, I have a pretty good idea that it's me. Its always been like that. That is, until "Lark Rise To Candleford" came out in movie form. I still have to get over the fact that that Dorcas is not me. But it's kind of nice hearing my name.
(Alright, alright, I was , that is, my name was, also in "Seven Brides For Seven Brothers" . Can we please stop talking about that?)
I digress...
Here's the page from Whimsy.
Thanks Guys!
You made my day!
I would blow kisses but I'm contagious right now, so I send virtual (((hugs))))


Friday, June 25, 2010

Blue In The Hair


Today's card is a combination of ideas from two challenges. LOTV Sketch challenge (with LOTV image)and Bee Crafty's Girly Pink challenge. They work very well together, don't you think? I used Distress inks and Stampin Up inks to color the image (all except the skin tones which were done with copics E00 and E11). The papers are all from my scrap stash. (yes, its endless! LOL) A close up of the girls:


Here is the sentiment which reads: "We'll be friends until we're blue in the hair" by River City Rubber Works.


And a detail of the stitching and the button area:


It did cross my mind that some of you may not "get" the joke in the sentiment. My daughter didn't for one. (though she laughed just the same) so I googled some things and came up with the following picture which should explain a few things....


OKay, that was a shocker! I hope you weren't taking a drink. LOL But it does make you reflect, doesn't it? What kind of old person will YOU become? Do you ever go to the mall and just "people watch"? Try to pick yourself out in 20 or 30 years? I do. I tell my daughter I will be the old lady who dresses from head to foot in a bright blue saggy-bottomed jogging suit cos it is "comfortable" just to embarass her! I may even have the blue hair to match. And I'll be tired of styling it by then so I'll just let it poof out in all its frizzy glory. Hahhaha I always wanted purple hair when I was little....
PS) I hope this picture isn't copyrighted. If it is I'm awfully sorry, will take it off imediately , never do it again and walk from here to Tokyo kneeling on uncooked rice...


Thursday, June 24, 2010

Missed You


This adorable bear digi I won in a DP2 challenge this week. I couldn't wait to get my "paws" on it and have some fun. (haw haw) . I colored them in with distress inks and used my blue paper scraps to create this 6x6 quilt. Machine stitching finishes the look. The ribbon is Offray and the adhesive pearls are Recollections.
It fits two challenges:
The Allsorts Weekly Sketch and
Mo's Digital Pencil challenge (which happens to be "anything goes" this week. Can't go wrong with that, right? :-)
Here are the bears up close:


And a close up of the pearl details:

That's it for today, folks. Ive had a bit of time today, being laid up with a summertime cold but the supper gong is calling me to get my butt in gear and make something for my family to eat so I'll say "so long, peeps" and happy crafting!


Monday, June 21, 2010

Coloring Fur With Distress Inks Part 3

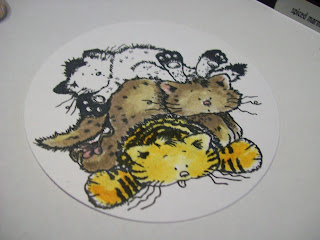
So we're down to the yellow tabby on the top of the pile! :-)
We're going to be using the same method that was discussed in the last two parts of the tutorial so if you're coming in at this point, you may want to back up and have a look at the previous posts.
I will be using three colors in the yellow tabby:
Scattered Straw
Brushed Cordouroy
Worn Lipstick

So you can start off by coloring the whole tabby in Scattered Straw

Repeat again but this time only in the shadows. Pay attention particularly to her armpits, chin and inner leg. Also the side of her face. This will make the areas that would naturally protrude (her belly and face), stand out)

Now go over those shadows again . This time with Brushed Cordouroy. You can use circular motions to blend it in with the last layer of color. See how cute she's looking?


Finish up with coloring her paws and nose in the Worn Lipstick. I outlined the entire image with "Spectrum Blue" Derwent watercolor pencil. (using gentle circular motions).This gives an image the illusion of being outdoors without coloring in the whole sheet of paper.

You can even give them a bit of shadow underneath so that they have something to sit on. This can help "ground" the image so that it's not floating around in space.I haven't done that this time but I may do so in the future when I actually come to use it in a card.

Thanks for stopping by and if you come by in a day or two you can see what I actually create with this cutie patootie image!


Coloring Fur With Distress Inks Part 2


Okay! So lets do the poor little squished orange Tabby on the bottom of the "pig Pile". I will be using the following Distress Inks for this tabby:
Spiced Marmalade
Vintage Photo
Worn Lipstick
Start off by coloring the whole tabby with a light coating of Spiced Marmalade..

then do the same thing again but this time only in the shadow areas.
Lay down more of the Spiced Marmalade here because we want the cat to be 3 dimentional and a 3 dimentional anything needs shadows!! Have a look at the next picture and you'll see what I mean:


And finally, lay down Vintage photo in your shadows to really darken them.
Don't be afraid of the dark! Its your shadows that will make your coloring come alive.
To finish up, color the nose and tongue with a bit of Worn Lipstick. Tada!


In Part 3 we'll move on to the final and sweetest kitty, the princess on the top, a pretty little yellow kitty...


Coloring Fur With Distress Inks Pt 1


Hi! I am going to show you the way I color fur with distress inks. Distres inks are perfect for coloring fur because they have a variety of very realistic earth hues which work perfectly. In Part One of this tutorial, I will be walking you through the brown kitty on this very cute digi image by Chrissy Armstrong which you can purchase through Squigglefly. (see the "links I love" on the left column)
So to get started, the tools of the trade. I use the following:
A size 1 synthetic round brush by Princeton
A glass ash tray for holding and rinsing my brush
An acrylic block for a palette and
Distress Inks in Pumice Stone, Frayed Burlap, Scattered Straw and Worn Lipstick

To get started, color the entire brown cat all over with Pumice stone. It won't look like much at this ponit but will start coming alive with every layer you put down.


And then go over it again in Pumice Stone, paying attention to where the shadows would fall and putting more color down in those areas as you can see below. Remember, a cat is a 3 dimentional object so try to picture in your mind's eye where the belly would bulge and make those areas lighter.


Now is the time to start adding a bit of frayed burlap to darken the shadows a bit more... see, its starting to come together now.


And to highlight, I used Scattered straw lightly over the entire image. This helped the cat's fur color not look so "flat", as if she was using a cheap box of hair color but gave her some dimention. A bit of Worn Lipstick helps to color in her nose, paws, an dthe delicate area around her ears.

What do you think?
In Part 2 we'll move on to the bottom kitty which will be an orange tabby.


Wednesday, June 16, 2010

OCC Sketch Challenge


This card was made for the OCC sketch challenge. Its a simple pattern which is perfect for this get well card. I used "Sneezing Henry " from Whimsy stamps and used distress inks for coloring. Accents are adhesive gems around the scalloped Nestability and a velvet ribbon. The papers are DCWV. Inside, the card reads: Do you know why I'm sending you a card? Because your contageous, that's why!"


Tuesday, June 15, 2010

Leg Bands

Well I have added to my list of "queasifying things". Previously on the list: Belly Buttons, Scabs, getting splinters out and now "Leg bands". I am referring, of course, to my ducks.

When we recieved our baby ducks in the mail they had little wire spiral ID rings to tell which were female and which were male. Since they were spiral, I assumed they must stretch as the ducks grow and come off on their own. But I've been keeping an eye on them and have found that they do NOT "grow" off but the leg grows around the band. (Ducks grow very fast) Oh dear, I am getting queasy....

I notified the company for some instructions and they said I should have taken them off within the first seven days of recieving them! Hello! Where was I supposed to find that out? I searched their site more than once for info relating to this...

Anyway, my husband got some wire cutters and plyers and my job was to hold the duck. Only I couldn't. Oh, I can hold a duck! But not for this procedure. See the queasiness factor took over. I warned him that the world was spinning and I was going to throw up. He gave me a pathetic look and told me to hold the duck.

IN the end, my daughter held the duck while I layed head first in the grass trying not to pass out.

Lessons learned: Get the dang rings off as soon as they come home! Two, companies need to be explicit with instructions for new animals. I'n not new to ducks but I am to leg bands. I hate to think what would have happened if we left it any longer...

A rather pale duck owner


Sunday, June 13, 2010

A Card For Tweety


This is a rather special card that I made for our daughter, Tweety. (she hasn't seen it yet and in fact I was up til after 11 last night finishing it after she went to bed). She is getting baptized next Sunday. Yay! She's been working really hard in her studies and her personal bible reading to make sure that she really knew what she was doing and that her relationship with God was coming first in her life . And now the time has come....my little girl is growing up. But we're very happy for her, especially in knowing that this was totally her decision with no cooercion on our part.

About the card: I followed the Card Pattern Sketch #68 and used a Whimsy digital stamp. It was actually a free digi. You might want to go by and check to see if they're still giving it away. It also follows the theme for June for the Whimsy stamps which is "summer". My daughter loves green so I used a selection of designer papers incorporating her favorite colors. I used Prismacolor colored pencils to color in the frog and a blender pen. I used some adhesive gems to decorate her bathing suit and umbrella. Here is a close up of the froggy:


And the sentiment:


And the inside.For this froggy I used distress inks.

Thanks for hopping by!:-)


Friday, June 11, 2010

Getting The Most From Your Nestabilities


Sometimes you may find (as I did) that your favorite Spellbinder's dies don't come quite large enough for your project. Well all is not lost. You can see here that the die that I needed to cover my image was the largest of the die set. But I still wanted a mat for it. So this is what I did. (by the way this is a stamp by "Whimsy" and colored with distress inks.)


First, cut a piece of cardstock to fit your image. Then tape your image down to the cardstock.


Like this! (sorry, you'll have to turn your head. Apparently "rotate " didn't work in posting)


Using a pair of sharp scissors (I am using Cutter Bee scissors here) follow along the lines of your die-cut shape. It does take a somewhat steady hand but it's not very difficult and no one is going to notice if it's not perfect. (you'll have to excuse my pudgy hands. The weather is changing.)


OKay! So now you have the finished product and you've really got your moneys worth from your limited dies. Hope this is useful to you. :-)


Bikini Card


I cannot take credit for the design of this card. If you want to see the original design as well as download a bikini template, check out Stampowl's site here.
Anyway, its a very fun card to make and I thought I would make one for the Cute Card Thursday challenge.

So to start with you have the "bare" essentials: Two pieces of coordinating paper and your naked card. LOL


Here is the complete pile of stuff used to make the card. The distress inks are Tattered Rose and Antique linen. I simply brushed them along the edges of the skin to give it some depth.


The front. You can make it as simple or as elaborate as you wish.. The words read, "Whenever you need support.."


detail


Behind view which reads "I'm behind you all the way"
If you choose to make one I hope you have a lot of fun!!


Related Posts with Thumbnails